How Do I Remove Duplicate Photos in Mac?
We love capturing images and then saving them in our Mac for the best viewing and editing experience. The images are good to be kept unless they clutter the system and their duplicates start occupying the precious space unnecessarily. Moreover, many images are similar and make most of the duplicate image’s space. This calls for a smart duplicate photo finder for Mac which is capable of scanning, searching and removing duplicate photos within a span of time.
How To Remove Duplicate Photos Using Duplicate Photo Finder?
Removing duplicate images from Mac could be really exhausting and time consuming. If you don’t wish to spend so much time in finding and sorting photos, here is the best duplicate finder by Systweak called Duplicate Photos Fixer Pro.
To use this, follow the steps below.
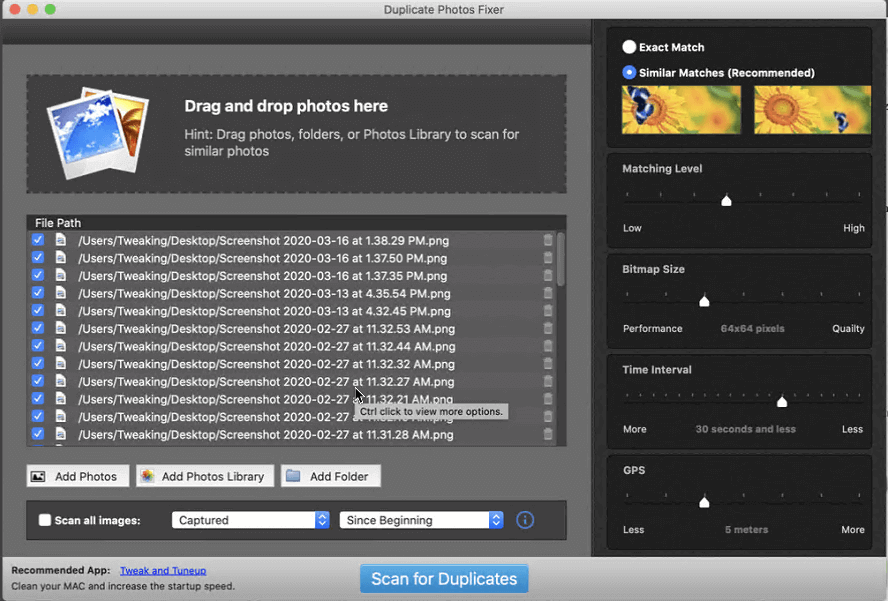
| Step 1: Download and install Duplicate Photos Fixer Pro on your Mac.
Step 2: You can add photos, photo library or folder for the process to begin. Or else you can also drag and drop the folder in this tool to scan the duplicate photos. Step 3: Now click ‘Scan for Duplicates’ to begin the scanning process. Step 4: Let the scanning complete and you will be able to get a list of duplicate photos in your system. Step 5: You can use the ‘Auto-Mark’ option which keeps one copy safe of each group and marks the duplicates available. If you do not wish to use Auto Mark, you can select the duplicates manually and make the best choice according to yourself. Step 6: Once done, click Trash and you will be free from all the duplicate and similar photos on your Mac. |
What Is Duplicate Photos Fixer For Mac?
This remarkable and unique tool is available for all the platforms and works accurately with its unique algorithms. It offers two comparison modes for best possible results including:
- Exact Match: This option will allow you to quickly identify the exact match and deduplicate images.
- Similar Match: When you use a similar match, you can easily locate and get rid of identical images. The best part is that you can change the settings through the bar available for matching level, bitmap size, GPS, time interval and much more, as and how they are required.
Apart from these features, you have the choice for auto marking the photos. Also, get a Selection Assistant in your hand so that the performance remains the smoothest way possible.
The Concept Of Similar Photos
Now the question comes about similar photos. Although we have been talking about removing duplicate photos as of now, similar photos play a good role in creating clutter. To get accurate results of similar photos, one needs to change the parameters.
Low Matching Level: When the slider is settled at extreme left, a low matching level is activated. For example, you can notice two images which look similar but at a very low level. The butterfly is present in one and almost absent on another.

Middle Matching Level: Whenever the slider is settled in the middle section, the degree of similarity is changed. Check the image below to understand the concept of middle matching level.

High Matching Level: The level of similarity changes again here when the slider comes to the exact right side.

We hope that you have understood the level of similar photos our systems usually occupy and we often miss them out due to negligence as well as less knowledge about similar. This is why it is recommended to try duplicate photo remover for Mac rather than using a manual method.
Manual Method
Apart from using a duplicate photo finder for Mac, the manual method is followed as explained
- Launch Photos app on your Mac.
- Go to File > New Smart Album
- Give your album a name and set proper filter
- As per your idea, duplicates will be marked when you import photos.
- Now to delete these photos, click Smart Photo Album from the right-side panel. Here, select the photos > right click them and delete them.
- Click Confirm when the message shows up.
- Now check the sidebar where you can see a folder mentioning ‘Recently Deleted’. Click it, select the images and delete all.
And this is how you can delete the photos through manual method.
Wrap Up
We hope that you have found out the reason for using Duplicate Photo Finder for Mac already here and will now be able to keep the system clean and optimized. How was your experience in using this tool and would you recommend it to others? Share your views, experience and more about this in the comments below. Moreover, if you have any questions or ideas apart from what is shared, please share them with us as well.